
– Yay for gluten free fried chicken, Laurie Colwin-style! –
In memory of Gourmet’s passing, I’d like to talk about one of America’s late, great food writers, Laurie Colwin, who used to write a column for this similarly passed (and prized) magazine. And with that, her famous fried chicken recipe.
Even though she wasn’t known for her food writing to begin with, Laurie Colwin is one of our culture’s great culinary writers. Laurie wrote about food on the side while producing novels, and, as the years progressed, she amassed a collection of essays that would infuse American food writing with an inalterable sense of character and compassion. Her words were more than a treat to the senses – they brought heart into the kitchen, helping readers to understand that with great food comes great love.
Her first collection of food essays, Home Cooking: A Writer in the Kitchen, is a brilliant book that has inspired many readers and cooks over the years. Laurie’s writing is warm and inviting, and she’s one of those wonderful women that can laugh at herself (and everyone else) while still sounding sincerely genial.
I think Clotilde Dusoulier put it best when she said, “I felt so full of fondness for the author that I suddenly had tears well up in my eyes, thinking that she was no longer alive, nor cooking, nor writing, and that I would never ever get to meet her.” (from a post to Chocolate and Zucchini, dated May 8, 2006)
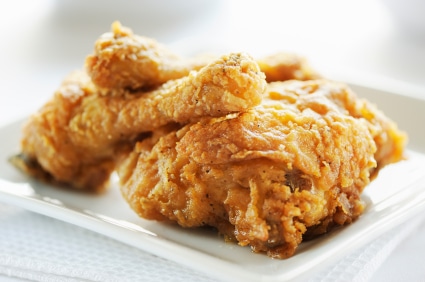
Laurie’s southern fried chicken recipe appears in Home Cooking, and to date, it’s the best fried chicken recipe that I’ve yet to find. I’ve followed her directions countless times with regular old white flour, and once I developed a gluten intolerance, I set to finding a way to making the recipe gluten free. So far I’ve discovered that chickpea flour (or a chickpea and fava bean blend) provides a nice texture with a lovely, hearty flavor. This will doubtlessly be one of those recipes that I update for years to come, adjusting it here and there as seems interesting.
Here are Laurie’s tips for making the perfect fried chicken:
- Fried chicken should be served warm. It should never be eaten straight from the fryer – it needs time to cool down and set.
- Contrary to popular belief, fried chicken should not be deep fried.
- Anyone who says you merely shake up the chicken in a bag of flour is fooling himself.
- Fried chicken must be made in a chicken fryer – a steep-sided frying pan with a domed top. Ed. Note: A deep sauté pan or a Dutch oven work just fine, as long as you have a lid.
- It must never be breaded or coated with anything except flour (which can be spiced with salt, pepper and paprika). No egg, no crumbs, no crushed Rice Krispies.
If you find a version that works well for you, please leave a comment and I’ll be happy to add your discoveries to the post. Awesome gluten free fried chicken recipes are tough to come by!
B’tayavon!
Laurie Colwin’s Gluten Free Fried Chicken Recipe
Ingredients
- One 3-pound chicken cut into parts
- 1 cup milk
- 1 cup chickpea flour
- 1 cup quinoa flour
- 1/2 teaspoon xanthan gum
- 1 teaspoon baking powder
- 1 teaspoon salt
- 1 teaspoon freshly ground black pepper
- 1 teaspoon pimentón dulce (smoked paprika)
- 1 teaspoon cayenne (optional)
- Several cups of oil for frying
- Light sesame oil
Instructions
- Chicken pieces should be roughly the same size – this means that you should cut breasts into quarters. If you don’t quarter the breast, you’ll end up with large underdone pieces.
- The chicken should be put in a dish and covered with a little water or milk, which will help keep the flour on (I used milk). Let the chicken stand at room temperature – it is a bad idea to put cold chicken into hot oil!
- Put the flour in a deep, wide bowl and season with salt, pepper, and optional smoked paprika and cayenne. Laurie recommends paprika because she adores paprika and feels it gives the chicken a smoky taste and beautiful color.
- Mix the chickpea flour, quinoa flour, xanthan gum, baking powder, salt, pepper, paprika, and cayenne in a bowl. Mix well and then sift together to make sure everything is completely distributed.
- Now, coat the chicken with the flour. To do this, lay a few pieces of chicken in the bowl and “pack the flour on a if you were a child making sand pies. Any excess flour should be packed between the layers. It’s important to make sure that every inch of chicken has a nice thick cover.”
- Let the chicken sit while you work with the frying oil. Laurie says that many folks recommend frying chicken in Crisco, but she prefers Wesson oil with about one-quarter part light sesame oil mixed in, which gives the chicken “a wonderful taste and is worth the extra expense.” For me, I used rice bran oil with light sesame oil mixed in, and it worked fabulously.
- The oil should come up to just under the halfway mark on your chicken fryer – say, about 1 to 1-1/2 inches deep. Over a medium flame, heat the oil to 360°F (182°C) (or until a piece of bread on a skewer fries as soon as you dip it on).
- Carefully slip into the oil as many pieces as will fit in the pan. Laurie says that the rule is to crowd the pan a bit. Turn the heat down to medium-low and cover the pan. She says, “the idea of covering frying chicken makes many people squeal, but it is the only correct method. It gets the chicken cooked through.” Ed. note: don’t mess with your chicken while it’s cooking. Poking and prodding will knock off your coating… so just let it alone!
- The chicken must be just done to that it is crispy but still juicy. She recommends about six minutes per side, turning only once. Dark meat will take a little longer, and use a sharp form to test the chicken to see if it’s done – when the chicken just slips off the fork, it is done inside.
- Take off the lid and turn up the heat to medium-high. Fry the chicken until it is “the color of Colonial pine stain – a dark honey color.”
- Remove the chicken from the oil and set it on a platter, then put the platter in the oven. If your oven has a gas pilot light, that should be enough heat. If you have an electric oven, flip it on ahead of time to the lowest setting and turn it off after two minutes. Let the chicken sit until it has cooled to a warm temperature. She doesn’t specify how long, though I let mine sit for at least half an hour.
- At this point, she says “You have now made the perfect fried chicken,” and that every time you make this recipe it will get even better.
Nutrition
This content was originally posted on FearlessFresh.com.